Friday, August 29, 2014

Baking Fail: Key Lime Pie/Soup?

Hi Guys!
Happy Friday! I thought this week I would share a funny story with you.. because... baking doesn't always go as planned ;)
So as you know from last Friday's post, my family recently had a little dinner party to send my little cousin off to college! I made a couple of desserts for the occasion including what I thought would be this awesome and super duper easy Key Lime Pie (Key Lime pie is becoming a favorite in our family lately)! My Uncle is a huge fan as are most of the boys! Since I was kind of pressed for time, I wanted to find a recipe that was quick and really easy (mistake #1). I came across what seemed like the easiest pie recipe in the world on Real Simple's website and it turned out to be well... interesting

Here's what you'll need:
1 Store bought Graham Cracker Pie Crust 
1 14oz can of Sweetened Condensed Milk
1 6oz can of Limeade Concentrate
1 Cup Heavy Cream


Instructions:
1. In the bowl of a stand mixer, beat Condensed Milk, Limeade Concentrate, and Heavy Cream, until mixture is thick and custard like (this will take about 5 minutes on medium speed)
2. Pour filling mixture into pie crust 
3. Refrigerate for at least 5-6 hours (overnight is best) until completely set
4. Top with Lime zest or Lime wedge (optional, I also added whipped cream to top mine)

This pie filling was indeed simple... and while it it tasted delicious, the consistency was a lot like soup, which made me a bit nervous! I hoped it would just set up in the fridge and be fine by dinner time the next night! I checked on my pie every couple of hours that night and it seemed to be setting nicely and thickening up! I was happy! So I decided to get fancy and top it with some homemade whipped cream and a lime green sugar sprinkle garnish! Beautiful! Looked great! I was very pleased with my super simple pie!
Sooooo, dessert time rolls around and I break out my fancy, delicious pies- feeling very proud of myself, and my uncle cut into the Key Lime Pie and took out a piece for himself and one for my boyfriend. Turns out the pie literally WAS SOUP on the inside! UGHHH! Horrible embarrassment! As my uncle so kindly put it: "Not your best work!" :( But as is usual with our family, it was all in good fun and everyone got a good laugh out of it! And of course there is no use in crying over spilled pie?? LOL! Despite its appearance and consistency, they did say it tasted pretty good still! ;)
Even though this was a huge baking fail, I still wanted to share it with you guys. It just goes to prove that some things don't always work the way you want them to or think they will! And this is especially true with baking! This wasn't my first baking fail, and I'm positive it won't be my last! Some recipes are just trial and error (although I don't think I will be trying this one again hahaha).  Lesson learned- don't take the easy way out!
If you do attempt this recipe (maybe you're crazy?), may I suggest serving it in bowls... with spoons! Haha!


Thanks for reading! Hope you all have a wonderful Labor Day weekend! Soak up these last little bits of summer! 

♥ Nichole

*This recipe was adapted from Real Simple 


Tuesday, August 26, 2014

Makeup Geek Eyeshadows: New Addiction!

Hello loves! 
Today I have a review for you that I am SO excited to share! My favorite thing to do lately is wind down at the end of a long day by watching the latest YouTube videos that my favorite gurus have recently uploaded. I am constantly finding new products to try or look into and their videos inspire to continue to be creative and try new things when it comes to beauty! I've been a little bit obsessed with Jaclyn Hill's channel recently, and in several of her videos she uses Makeup Geek products. Jaclyn has raved about the Makeup Geek eyeshadows and said that they were her absolute favorite. Com'on... after a review like that... you know I had to get my hands on some! ;)
A few weeks ago, my BFF and I decided to place an order together and got some of the eyeshadow colors that we have been hearing about and eyeing up on the site! I ordered four shadow pans and a rounded blush brush! 
These shadows are so so so pigmented and creamy! They apply like a dream! I do not experience fall out under my eyes at all with these! It really was love at first swatch with all of them! I loved the first few so much that I NEEDED to order more! At only $5.99 each, they are super affordable! I pop them right into my DIY ZPalette that I made a few nights ago!

Here are some swatches and short descriptions:

Peach Beach- Soft peach tone, matte shade. Love this as a transition shade for the crease or a blending shade!
Cupcake- Beautiful matte pink color. Has just a touch of mauve to it. Also love this one for the crease and blending!
Mermaid- Gorgeous satin bluish teal shade. Love this on the lid or for a pop of color liner.
Shimma Shimma- Pretty, pearly, and shimmery highlight tone. Love this on the inner corners and brow bone! It's just amazing!
Frappe- Warm matte brown tone, perfect crease shade! I am quickly falling in love with this one!
Hipster- Cool taupe tone that is incredible! Great color for Fall all over the lid or blended into the crease!
Cinderella- Beautiful pink toned satin highlight! Perfect for all over the lid or brow bone!
Glamorous- Totally gorgeous goldish bronze satin tone! Great for a pop of color and very versatile!
Homecoming- The most perfect Champagne Gold satin tone with just a touch of taupe! Totally obsessed with this one!
Cocoa Bear- Very warm brown tone! So pretty for the crease!
Country Girl- Omg! This one might be my favorite! Warm matte wine shade! So many options with this one! Great for Fall all over the lid or in the crease!

As you can probably tell, I went mostly for my typical taupes, browns, and bronzy shades, but I still wanted to put in some pops of color! I think all of these eyeshadow shades will be perfect for transitioning from late Summer to early Fall (and even work well for actually Fall)! I'm so excited to keep working with these on a daily basis and I know it probably won't be long before I put in another order for more!
If you are looking for a new eyeshadow to try I would definitely recommend these! So affordable, so many shades to choose from, and seriously great quality!
Eye look created with Beaches and Cream all over lid, Cupcake blended into crease, Frappe to darken crease, Cocoa Bear on outer corner of crease and Shimma Shimma to highlight brow bone and inner corners.
I know its hard to see.. and please excuse my ratchet hair (because Tuesday blah) and horrible office lighting.

As always, thanks so much for reading! I seriously love you guys!
 ♥ Nichole


*All are $5.99 


Friday, August 22, 2014

Glorious Nutter Butter Pie

Hi everyone! Happy Friday!
Hope you have all had a good week so far! 
This weekend my baby cousin leaves for Towson University! I can't believe how quickly time goes! Seems like she was just a little girl and I was doing her makeup and giving her her first highlights! As usual, our big Italian- Irish family put together a pasta dinner (complete with Grammy's Gravy recipe) to send her off! Dinners like this one used to be a weekly event for our family, and they are some of my favorite memories from when I was growing up! We don't get to do them as often anymore, but I love that we still make an effort to get together and celebrate milestones and new chapters in each others lives.
So, I decided to whip up a couple of desserts for the occasion, because... well, that's what Grammy always did! A few days ago, I was browsing one of my favorite blogs, Cookies & Cups, and saw a recipe for what looked like the most delicious pie I have evahhh seen! Like evahhh!!! Now, I'm not usually a pie person, but there was something about this Nutter Butter Pie that looked and sounded delectable! And I knew my family would enjoy it! The funniest part is the fact that I had never had a Nutter Butter cookie until a few months ago... I had no clue I was missing out on such a yummy snack cookie! So I felt like this Pie needed to be made, especially to make up for the fact that I was late to the Nutter Butter party in life!

Here is what you'll need:
For the crust:
About 24 Nutter Butter cookies, crushed
6 Tbsp melted butter

For the filling:
8oz Cream Cheese, softened 
1 Cup Marshmallow Fluff
1/3 Cup Creamy Peanut Butter
1 Cup Heavy Cream, whipped
About 12 Nutter Butter cookies, crushed

For the topping:
1/2 Cup Heavy Cream
1 Tbsp Powdered Sugar
1/4 Cup Creamy Peanut Butter, for drizzling on top
2-4 Nutter Butter cookies, crushed

Instructions:
1. Preheat oven to 350 degrees
2. Crush 24 Nutter Butter cookies (you can do this in a ziplock bag, I used a food processor
3. In a large bowl, mix butter with crushed Nutter Butter cookies until well combined
4. Evenly press crust mixture into the bottom of a 9'' pie pan and up the sides (I used the back of a large spoon to press and shape the mixture), make sure mixture is packed well so the crust holds and keeps it's shape.
5. Place crust into the oven for 12-15 minutes, until set.
6. While crust is cooling, crush 12 more Nutter Butter cookies (I used the ziplock method for these ones), and begin working on filling mixture by beating cream cheese, marshmallow fluff, and peanut butter together. 
7. In a separate bowl whip heavy cream until soft peaks form.
8. Fold the whipped cream into the cream cheese, fluff, and peanut butter mixture until completely combined. Add crushed Nutter Butters to filling mixture.
9. Evenly spread filling mixture into cooled pie crust.
10. Whip heavy cream and powdered sugar until soft peaks form, then evenly spread whipped cream on top of pie filling. 
11. Warm peanut butter in the microwave for 20-40 seconds. Drizzle over top of whipped topping. (optional)
12. Crush 2-4 Nutter Butter cookies and sprinkle on top (also optional).
This pie was such a huge hit with everyone (even Rosie) and it was the perfect addition to a lovely meal with family! And it was super easy!
I would like to wish my baby cousin the best of luck this weekend as she makes the move to Towson! I am very proud of you and know you will do great! We love you! ♥
Thanks so much for reading, and I hope you find this Nutter Butter Pie as delicious as me and my family did!
Have a great weekend!

♥ Nichole

Ps. Side story: The other night I also made Butter Chicken from Cookies and Cups blog for my boyfriend and I. It was amazing! So amazing that I took a picture and posted it to Instagram and tagged her in it! Well, she liked and commented on the picture with little heart eyed emojis and I was totally geeking out! Lol! My boyfriend thought I was crazy because I was so starstruck and excited! But seriously, I worship the bloggers and beauty gurus that I mention on here! Please take the time to check out their blogs and videos as well! They are full of amazing stuff and never disappoint! :)

Recipe adapted from Cookies & Cups


Thursday, August 14, 2014

Time To Get Crafty: DIY ZPalette

Hi guys!
Hope you are all having a good week!
I recently ordered a few loose eyeshadow pans from MakeupGeek and I also had some ELF ones lying around for a while. I couldn't stand having them just kind of laying around on my vanity haphazardly anymore and they need something to protect them more! I knew I needed to invest in something.. and fast so I had been browsing ZPalettes online. Now this might sound cheap of me, but I was really having trouble justifying spending the $14-$25 on a container that would hold the eyeshadow pans I have been purchasing. I mean.. c'mon, there are so many other things on my beauty product wishlist that I would rather spend that money on! Am I right?! I can't be alone here on this one! So, long story short, I decided to find a way to make one myself!
I looked up a few DIY options and found that a lot of people were using empty DVD cases and cutting the hard plastic with an x acto knife. While this seemed to be an effective way to make one, it also sounded like a trip to the ER for Nichole. ;) I wanted this project to be a simple as possible for me! My initial intention was to use an old clear CD case. It was a bit smaller and wouldn't need to be cut because it was already clear! I decided to head to Michael's and pick up the supplies I would need! BUT, while browsing the aisles of Michael's I found something even better than an old CD case. It was a small and compact beading box! It reminded me more of an actual palette and had enough height to it that I would be able to add another layer or two of shadow pans if I needed to! I was sold! I found the other supplies I needed and went home and got to work!
Here is what you will need and the steps that I used to make my very own homemade ZPalette!
What you need: 
1. Beading box 
2. Magnet sheets 
3. Pretty scrap booking paper 
(you could also use wrapping paper or stationary you have lying around)
4. Scissors
5. Pen/ pencil (for tracing)
6. Hot glue gun

First, I traced the outline of my beading box onto the magnet sheet. I then cut the magnet sheet out and made sure it fit into the bottom of the beading box. I had to trim the sides down just a little to make sure it laid completely flat on the bottom of the box. Next, I traced the magnet sheet on the back of the scrap booking paper and then cut the paper out. Once everything was cut out and fitting into the bottom of the box the way I wanted it to, I started to glue the scrapbook paper to the magnet sheet. *Important: make sure the magnet sheet is magnet side up (the black side).* I just put a tiny dot of hot glue in each corner of the magnet sheet, made sure the scrapbook paper lined up with the corners evenly and that the paper was flush against the magnet so it wasn't lifting in the center too much (this will help the eyeshadow pans magnetize to the magnet sheet better). On the back (white side of magnet sheet) I put another tiny hot glue dot in all four corners and gently lowered the magnet sheet into the bottom of the beading box (make sure you press the corners in as hard as you can so the glue flattens out as much as possible)! And then... Voila! Your DIY ZPalette is complete! Just add your eyeshadow pans and make sure they magnetize to the sheet!
So that was my little DIY project for last night! I'm really glad I was able to find a less expensive solution to contain my eyeshadow pans! It was really becoming a problem and driving me crazy! Now I feel like I can purchase some more of the MakeupGeek eyeshadows that I have been dying for lately! Hopefully this post is helpful if you find yourself in a similar conundrum! It was really simple to do and I saved a ton of money! I also made one for my BFF and both cost me less than $10 to make! Other than the beading boxes, I still have a ton of supplies left over too! Are there any DIY solutions to beauty product storage that you have tried? If so I would love to hear about them! 

♥ Nichole

*Tip: If for some reason some of your eyeshadow pans are not already magnetic (the ELF ones come with round magnets on the back and MakeupGeek pans are already magnetic), you can purchase a roll of magnet tape in the craft store or round magnets are available on the MakeupGeek Store. 


*I can't seem to find the box I used on Michael's website, but it ran between $2-$3 in store
ProMAG Magnetic Sheets $4.39
*Pink Leopard print scrapbook paper was $0.59 in store


Tuesday, August 12, 2014

Radiant Orchid Obsession!

Hi everyone! 
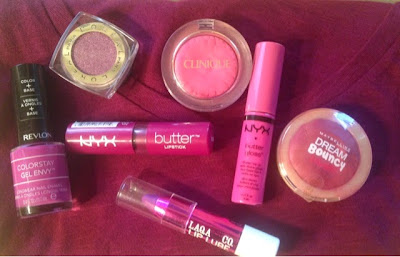
So, I'm sure most of you have already noticed, Radiant Orchid is EVERYWHERE!! And... I am totally obsessed! I cannot seem to get enough of this color lately! I've just been gravitating to it in all forms! It's so pretty, bright and fun... and seeing it just seems to make me happy! It's kind of funny because when this color was first named as Pantone's Color of The Year for 2014, I was a little blah about it. I went on a huge plum craze a few years ago and had just kind of been over the whole purple thing. But, the more I see Radiant Orchid working it's way in to popular trends, the more I want all things Radiant Orchid! Told you... I'm obsessed! I started realizing that I have developed a little collection of various Radiant Orchid items and I thought I would share with you! 
My first real introduction to Radiant Orchid actually came from a lip product that was in my June Birchbox! When I first opened the box and saw the LAQA & Co. Sheer Lip Lube Pencil in Menatour I was a little skeptical. I immediately thought "Damn! What a waste, I'll never wear this!". But then I swatched it and was pleasantly surprised that I didn't hate it! And then, I put it on my lips, looked in the mirror and LOVED it! I was really surprised that the color worked for me. That was just the beginning of a budding obsession! It has easily been one of my go-to lip products all summer! The product itself is a sheer, but very pigmented creamy and smooth consistency. Even with the bright color I find that it glides on super easily and doesn't bleed all over my lip line. The staying power isn't the best, and does need to be reapplied after eating or drinking! If you are looking for a simple way to ease in to the Radiant Orchid trend, this is definitely a great option! 
One night over dinner my boyfriend asked why I never wear "color" eyeshadows (as in blues, greens, purples, pinks, etc.) and why I always stick to "brown". Truth is I just never thought most bright colors looked very good on me and always wanted to avoid looking like a clown! Or worse, Mimi from that Drew Cary show years back (I think it traumatized me)! Any way, a few days later I was browsing CVS and was staring at one of my other recent obsessions, L'Oreal' Infallible Eyeshadows. I saw a pretty Radiant Orchid-ish shade and thought it would be a nice way to work some "color" into my eyeshadow look and see what my boyfriend thought of it! So on our next date night I used this color all over the lid and then went into the crease with a dark brown from the same collection and used a little gold highlight on my brow bone and inner corners! He loved it! Now, he is a guy so the most I got out of him was "It looks nice... I like it!" Haha, but it was nice to change it up a bit, not just for him, but myself too! It's nice to get out of "the box" every now and then!
Now, this next product is where I think my obsession really started to take off... I was standing at the Clinique counter with my mom a few weeks ago while she made a quick return, and I saw the Cheek Pop blushes. All of the pretty, bright, fun, pinky, purpley, orchid colors started to draw me in! I swatched a few of them and felt that rush of excitement that all makeup addicts feel when they find a fun new product! ;) I decided it wasn't worth trying to resist and that I had to have one! I chose the color Plum Pop which was a little on the pinker side of orchid, but I was still new to the trend so I didn't want to go cray.. and because... Mimi. Once I started using this at home I found the color to be less intense than I wanted it to be. I was a little bummed at myself for playing it safe and thought that I should have gone with one of the truer purple orchid colors they had in the line. I still may go back and pick one up though ;)
In the meantime, I wanted to make the color work for me and decided that I needed something to help it along to give it the more purple orchid feel I was going for. I picked up a Maybelline Dream Bouncy Blush which I also have been loving) in Orchid Hush, which is a cream blush. This totally helped the Clinique blush pop! I've been putting my blush brush into the Maybelline cream blush and stippling it on my cheeks, and then topping that off with the Clinique powder blush in the same stippling motion. 
This works wonders for the color I wanted to achieve and by topping it with the powder blush I am able to set the cream blush! I've been loving the combination for the last two weeks or so!
My next purchase came when I decided that I needed to check out the NYX Butter Glosses! Any other time I would have definitely gone for a coral or nude colored gloss from this line. But, I was full on in the midst of Radiant Orchid obsession and decided to go with a color that would satisfy my urges to have more of this fabulous color in my life! I chose the color Strawberry Parfait. I love these glosses so much! They are very sheer, but still pigmented enough that they have decent color payoff. The texture is smooth and not at all goopy! I love this gloss on its on for a more subtle every day look or used to top off a more intense color and add some shine. 
For most of this summer I have been using Revlon's Gel Envy Nail Enamels! These things are amazing! They are super pigmented and opaque, and the whole system is easy to use and pretty fool proof! I saw the Radiant Orchid-ish color, Up The Ante, in a magazine and literally had to stop at CVS on my way home the next day so I could have it! There was only one left on the shelf, so I knew it was meant to be! ;) I went home that night and got to work on my mani-pedi with my pretty new polish! After one coat of this color I was deeply in love with it! It is soooo gorgeous!!! I have been wearing it for almost 3 weeks now with no end in sight! The color makes me instantly happy when I see it on my nails! If you buy only one thing in the Radiant Orchid trend, make it this nail polish! You will not be disappointed! :) I promise!
In my last Ulta haul post I talked about new NYX Butter Lipstick that I picked up in the color Hunk! I've used this one a few times over the last week and I LOVE it! Its a bit of a deeper Radiant Orchid shade, but I love that it is bright enough to be worn now in the later summer months and that it will totally work as a nice Fall color also! Best of both worlds if you ask me!
And lastly (for now at least), my Radiant Orchid obsession has officially made its way into my wardrobe! I was in Old Navy this weekend and when I saw the color of this t-shirt, and that there was only one left, AND it was my size, I quickly scooped it up! Its just a simple v-neck t-shirt, but I love the simplicity of it and that I will be able to dress it up or down! Its also a great transitional top for in between Summer and Fall!
 I'm sure the t-shirt will be the first of many items in this color to be added to my wardrobe this Fall! I already have my eyes on some jewelry and accessories! :)
Is anyone else dying over this color lately? If so let me know what goodies you have found and what I should try out! I can't wait to see what other fun Radiant Orchid things come out for the Fall season! I hope everyone is having a good week so far! As always, thanks for reading!

♥ Nichole 


Thursday, August 7, 2014

Too Faced Rock N Roll Rock Candy Eye Shadow Collection Review

Hi guys!
So as you know from my previous Ulta haul, I picked up the new Too Faced Rock N Roll palette that I just couldn't wait to have! I planned on waiting until closer to Fall for this one because of the pretty jewel tones and darker shades, but I ran out of patience! Is anyone else DYING for fall yet or is it just me?
First of all, how adorable is the packaging?! I love the pink and black design! There are nine colors in the palette, all named after various music genres, which I thought was a really cool way to present them! There is only one totally matte shade in the pallet (Rockabilly) that makes a great highlight shade, while the other eight shadows all have a shimmer or glitter to them. The more shimmery shades are New Romantic (also a highlight shade) and Ska. New Wave, Rap, Pop, Heavy Metal, Glam Rock, and Punk all have a very glittery finish.
The right side of the palette has all of the lighter highlighting colors. The top color, Rockabilly, is a creamy matte shade that is best for highlighting. Its a basic neutral color that is cream/ off white and always good to have on hand in a palette like this! The middle color, New Wave, is a very, very, very glittery pinkish toned highlighter. I find this one to be a little bit chalky with really chunky glitter. Not my favorite look! The bottom color, New Romantic, is my favorite! It is a creamy, almost champagne toned color that is so pretty on the brow bone! I really like the way it plays off the darker colors in this palette and blends everything together really nicely! 
The middle column of the pallet has some of the brighter pops of color. The top color is Rap, a gorgeous bright gold, edgy color that definitely gives off  a bit of that Rock & Roll feel! I love this in the inner corners of my eyelids for a pop of color! It's creamy and has glitter throughout, but I think the bright color tones down some of the sparkle! It's one of my favorite colors in the palette! The middle color, Pop, is a pretty, but super dark plum color...like SUPER dark! Much darker on the eyes than in the pan or swatch! This also has some glitter in it as well, but nothing crazy. I was able to use this the other day as my outer corner color and blend it up into the crease to soften it up a bit and get a really pretty eye look without it being too harsh! The bottom color, Glam Rock, is a really hard color to describe! Its is almost a gun metal or pewter type of color with a greenish undertone that also has glitter in it. I've been a little puzzled over how I want to use this one honestly! It is really pretty and I'm thinking it might be good for a darker smokey eye!
The left side of the palette has the darkest colors. I'm slightly obsessed with the top swatch, Ska! It is such a pretty brown color with a little bit of bronze in it! It is one of the few shimmery shades in the palette and I think it is really versatile! I love using it all over the lid with a darker shade in my crease or with a lighter color on the lid and then put this in my crease! So many options with this one! The middle color, Heavy Metal scares me just a little bit hahaha! I find this one really difficult to use! It is a very dark navy blue color with glitter and I'm really just not so sure about this one. Other than using this as a liner on my upper lash line, I don't see a whole lot of options for it in everyday use. I think this one is the color that they really could have omitted from the palette altogether. The bottom and last color is Punk. This one is a dark forest greenish color that almost pulls black with (you guessed it!!) glitter in it. I'm not a huge fan of this one either to be honest. I think this is also a difficult color to work with. I would have much rather seen a true black shadow with some shimmer or glitter than a greenish shade. Just kinda meh about it really. 
Eye look using Ska on lids, Rap in crease and inner corners, and Rockabilly as highlight
Overall, I am really on the fence with the collection of shadows in this palette. I definitely had higher hopes for it and expected to be more excited to use it/ more impressed by it. It's just kind of confusing and I don't think there are a ton of different looks that you can really create with these nine colors alone. I feel like all you're really getting are a bunch of highlight colors and a bunch of dark colors. Neither of which really scream Rock N Roll to me! While the concept is a good one, I think they just totally missed the mark with the colors they chose to include. I think they would have been better off mixing up the finishes of these shadows a bit more. DEFINITELY less glitter would have been better, but more matte color options or more shimmer would have been great in my opinion! Even something a little more like the packaging would have been nice. Including a nice pink color, black, or silver would have tied it all together nicely! I think if they released their three newest palettes (Country, Rock N Roll, and Cat Eye) together in one larger palette (kind of like the Chocolate Bar) the look options would have been amazing! 
I plan to keep messing around with different looks from this palette and seeing if any of my opinions change (which I will definitely update if they do). I may try to work in some other shadows I have to see if I can balance some of it out or create a look that works better for me. 
Let me know if you have given this palette a try and what you think!
Thanks for reading and I hope you have a great weekend! 

♥ Nichole


Tuesday, August 5, 2014

HAUL!!! Ulta & CVS

Hello loves! So as promised, I did some shopping this weekend and picked up a bunch of fun goodies! There's a lot of stuff, so I'll just jump right in to it! 
During my Ulta trip the first thing I grabbed was something I've been DYING to pick up! I was planning on waiting until it got closeR to Fall, but I just couldn't help myself! ;) The Too Faced Rock N Roll Rock Candy Eye Shadow Collection palette is absolutely gorgeous! I love the jewel toned colors for Fall! The darker shadows are super pigmented and have a creamier texture, while the highlight shades seem to be a little less pigmented than I would like! The "Classic" highlight color, New Wave, has a lot of glitter and doesn't go on quite as smooth as the others. I plan on messing around with this one a lot more, and will most likely end up doing a full review on it soon, so stay tuned!
Swatches from Top left: Rockabilly, New Wave, New Romantic, Rap, Pop, Glam Rock, Ska, Heavy Metal, & Punk

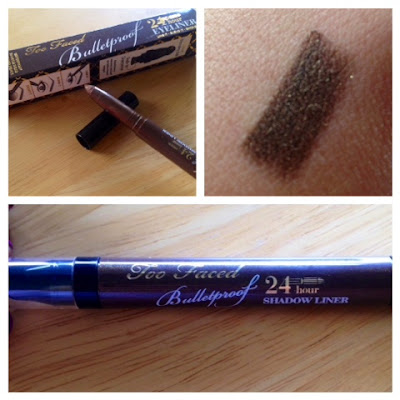
Also from Too faced I picked up a Bulletproof 24 hour Eyeliner in Dirt Bag. It is a jumbo eyeliner pencil that can be used to line the eyes, smudge out, or used as a shadow stick! I love the versatility of this product! I swatched this little baby in the store, and let me tell you, the staying power of this thing is AMAZING! Even after washing my hands it did not budge at all! I've been trying it out as an eyeliner the last two days and I think I am in love with it! I'm going to try using it a few different ways and can't wait to see what this thing can really do!
This Mally Beauty Evercolor Startlight Waterproof Eyeliner in Caribbean Sea is actually something my Mom threw into the Ulta bag! She has been eyeing up this color for a while now (as have I) and since we are both such big fans of these liners, she decided to give in and I'm so glad she did! This color is sooo pretty! I love the bright pop of color! Since we already know how well these liner from Mally Beauty perform, I think this color will be great with their formula! No worrying that a brighter color may stray oR smudge a bit more, which is definitely not a good look! I just might have to steal this from her... LOL!
  
The newer shades of the NYX Butter Lipsticks totally caught my eye! They were kind of hiding out on the end of an aisle and there weren't a ton out, but I am so glad I saw them because they might just be my new obsession! The color at the top Hunk, is the juiciest plum color! It has a tiny bit of a pinky undertone, and I absolutely love it! The color is bright, fun, and really different from any of the other lipsticks I own. The color on bottom, Pops, is a really pretty nude pink color with just a hint of mauvey taupe! I can't wait to wear this on a crisp fall day with great boots! These lipsticks go on so so buttery soft and smooth with a touch of a glossy finish! I just LOVE them! I'll definitely be picking up several more of these I think! ;)
Another NYX lip product I've been wanting to try out are the new Soft Matte Lip Creams! The matte lip products seem to be popping up from a few brands lately, and these remind me a lot of the Too Faced Melted Liquefied Long Wear Lipsticks! The Too faced ones had caught my attention earlier this summer because I thought they were really different. However, when I swatched them and put some on in the store, I found them to be a little dry and I didn't think I would really like the effect. Also the Too faced ones go for $21, which isn't too badly priced, but for something I won't love, I can't justify the price! So long story short, I wanted to give the whole matte lip look a go and thought this option from NYX would be a great place to start! For starters these lip creams are extremely pigmented, which I love! They go on very creamy and it takes very little product to achieve a bright lip color that pops! I tried it out for a few hours and I didn't hate it, but I wasn't enamored by it either. I didn't find that it lasted very long, and also found that it was barely there after eating and drinking. BUT, it does totally stain your hand when you swatch it! Haha! 
I'm always on the hunt for a great concealer, but then again who isn't? I've been hearing a lot of great things on various beauty guru's YouTube videos about this Maybelline Instant Age Rewind Eraser Dark Circle Treatment Concealer (also the longest name of a product ever)! So far I like the texture a lot! It is creamy and just thick enough to really give great coverage, but not so think that its going to get cakey under my eyes! The applicator is nice and soft (and I actually think there is something weirdly cute about the little puff)! I'll keep giving this a try and compare it to some of my other concealers that I have been liking lately! I'll let you know how it stacks up! ;)
So, all summer long I've been obsessed with coconut scented everything! I just love the summery, beachy smell and makes me think of a breezy vacation by the sea (which is as close to a vaca as I'm getting any time soon)! This Coconut Soap from The Body Shop is actually a repurchase (3rd time) and this should have gone in my July favorites post, but the only one I had was a tiny sliver left in the shower! Haha! There isn't anything truly amazing or life changing about it... its pretty much a basic bar of soap, but I can't stop purchasing it! 
I also did a mini CVS haul this weekend since Ulta happened to be out of a few things I was looking for. 
I picked up some necessity stuff obviously, like tooth past (the Crest 3D White Luxe Glamorous White has been my favorite lately), and CVS brand oil free eye makeup remover (comparable to Neutrogena's oil free eye makeup remover- only a bit cheaper and it doesn't burn my eyes). They were running a great deal on the eye makeup remover, 100% more product for the same price! Can't beat that! 
I saw this Burt's Bees' Coconut Foot Creme on Pinterest, and I since flip flips and sandals have been drying my feet out like crazy, I quickly decided this was a must! However, I'm a bit bummed out about it. :( I was totally expecting a nice creamy consistency that smelled super coconutty, but unfortunately it is more of a greasy yellowish balm that smells like peppermint (barely ANY coconut scent). I'm hesitant to even use it because I don't want my feet to get so greasy that I'm sliding around in my shoes all day. But I'll give it a try I guess. I just think it is poorly described on the packaging. "Creme" does not mean balm in my world! Uhg.
As I posted in my July Favorites, I have been loving these Maybelline Dream Bouncy Blushes! I'm also loving orchid and plum colored everything, so this Plum Wine color was a no-brainer when I saw it! It's just so so so pretty! I love that this is bright enough to still work for the rest of summer, but also plumish enough that I can easily take it with me in to the Fall! 
Maybelline products were buy one, get on 50% off, so I decided to pick up a Baby Skin Instant Pore Eraser Primer! This was also a repurchased product, and its not my favorite primer out there, but I do like it! I usually use this on work days (because good/ expensive makeup shouldn't be wasted on days sitting at an office desk)! It gets me through the day with minimal shine or oiliness, and is does give a nice base for foundation. The consistency reminds me a lot of the Smashbox Photo Finish Foundation Primer, and I actually think it performs very similarly (and ahem.. its a like 1/5 of the price)!   
And last but not least... I had to purchase another NYX lip product! ;) I've been looking for the Butter Gloss in Tiramisu for a while, and it was always out of stock in Ulta! So... I basically jumped on it when I saw it in CVS! It is sooo lovely! The perfect shiny nude pinky color for Fall!! ♥ I'm in love! I actually think this will look great to top off the NYX Butter Lipstick I bought in Pops (see above). Its just so creamy! Not sticky or goopy at all! I definitely recommend checking these glosses out! 

So, as you can see, it was a busy weekend! ;) I had a nice double date night on Friday with the Boyfriend, spent some time with family on Saturday (even dyed my Aunt & cousin's hair!) and then spent some time with my BFF Sunday night! I hope you all had a great weekend also! Let me know what you've been trying out, buying, loving, and hating! I would love to hear about it!

♥ Nichole


Crest 3D White Luxe Toothpaste, Glamorous White 2 Pack $8.99 ( I can only find it in a two pack online)
CVS Oil Free Eye Makeup Remover $6.49 (100% more promo not online)